Code Builder
Gain speed and freedom designing integrations with the Code Builder
The LinkApi Code Builder is the main tool that will help you build integrations, giving you full control of your data. Use our SDK to improve your work time -- coding less and building even more. In this guide we will present the feature and how to use it.
Open a project
In the main menu, access the Builder tab and choose between Automation or API projects. If you don't have any, it's time to create a new one. Learn more about Projects
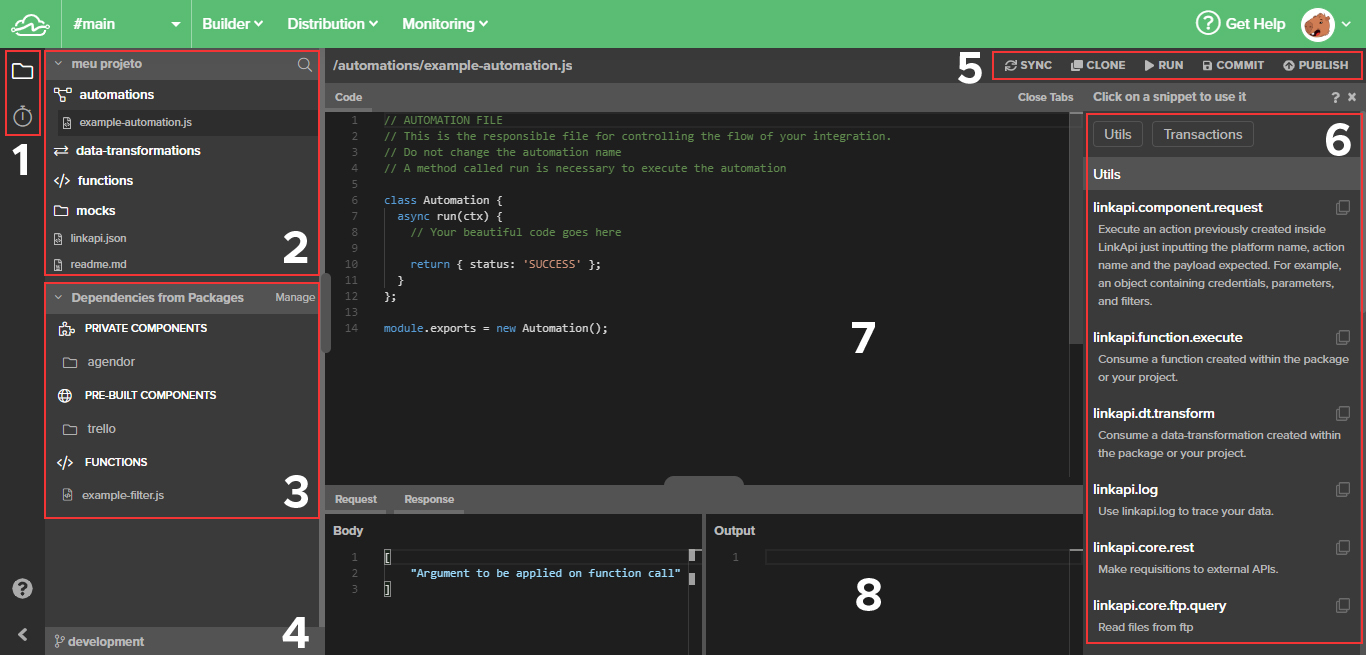
The Code Builder

- Use this sidebar to navigate between the Code Builder and other project configurations.
- Your project's directory. These are the files inside your Project, including Automations, Data-transformations, Functions and much more.
- Your project's Dependencies. These are your files from the Packages list that you selected creating your project. You can extend, snippet and edit them if you want. There are different actions on each snippet, depending on the file you're editing. Try them all!
- Change branches between development and master. Build and code freely in the dev branch and just publish to the final users when you're ready. The master branch is read-only.
- The Action Bar will adapt for every different file you're editing. Sync, Clone, Save and Commit your project, among other actions. You have to publish your automations to put them to work.
- Use our SDK Snippets to increase your productivity. Just one click to copy and utilize useful functions to your project. Know more about Snippets.
- The Code Terminal. Just like your friendly coding tool. Try searching and using common shortcuts!
- This is the request body and response tool. Input an array to test with mocked data in the Body section and press the ▶ Run button on the Action Bar (5). The output will show the returned data. When you're editing an Automation, use the mock files and snippets to setup any tests that will be reusable.
FAQ
How to navigate between development environments/branches?
Use the branch button (4) located at the bottom left of the screen to change between the development and master environments.
How to update my work from the development branch to master?
With the development branch selected, click the Publish button on the Action Bar (5) and confirm. This action will merge all content from the development to the master branch and publish your project.
Important notes
- For safety reasons, the master branch is read-only, preventing any mistakes and unwanted edits on the main files. We recommend working only on the development branch, running tests, and then publishing to the master branch.
- Jobs created from a project always reflect the same in the master environments.
- Publishing your project, the developer must have in mind that all jobs reflecting deleted automations will be deleted as well.
- It's not possible to create jobs to automations in the development branch at the moment.
Updated over 6 years ago
